Pilates roll-ups are one of those sneaky strength exercises. Looks simple and easy. Just sit and lie down. But when performed with proper form and mechanics, this basic exercise will humble even the most advanced Pilates student.
“Although it’s considered a classic, it’s not an exercise for beginners,” says Lauren George, a certified Pilates instructor and founder of Lauren George Fitness. “Sure, it can be modified for beginners, but it’s definitely difficult.”
However, the benefits are worth the effort. If you want a strong and stable core, increased spinal flexibility, and a sculpted midsection, add Pilates roll-up exercises to your fitness routine.
To help you get the most out of ab roll-ups, we’ve included step-by-step instructions, expert-backed tips, and modifications for everyone from fitness beginners to Pilates pros.
Grab your mat and get ready to activate your core with Pilates roll-ups.
Pilates Roll-Up: Step-by-Step Instructions
You don’t need any equipment to perform a standard Pilates roll-up, but it’s a good idea to have a yoga mat for comfort.
- Sit tall on your sit bones, feet together and extended, toes pointing forward.
- Stretch your arms out in front of you at shoulder height and take a deep breath.
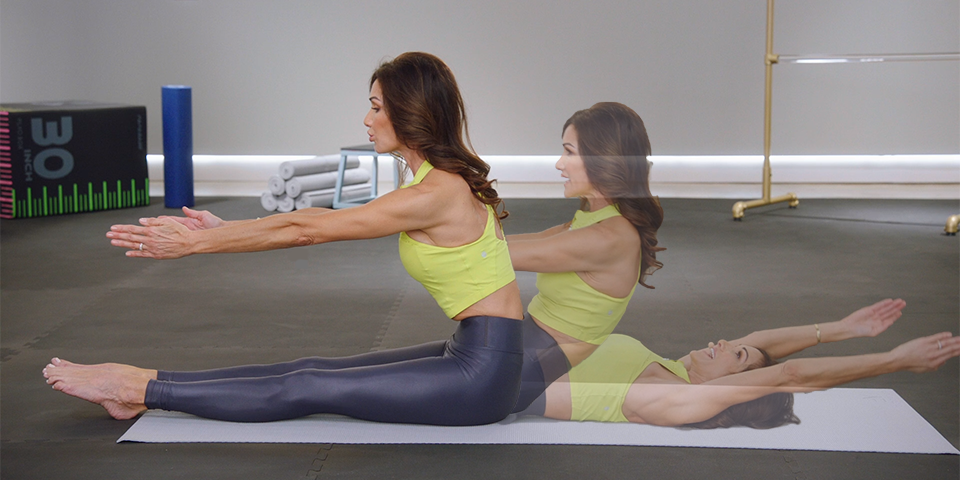
- As you exhale, pull your pubic bone toward your belly button and cup your stomach inward. Maintaining a C-shaped curve with your spine and arms extended, lower your back to the ground one vertebra at a time, starting at your lumbar vertebrae (lower back) and ending at your head, so your arms are overhead.
- Inhale deeply, and on the next exhale, bring your arms back in front of your shoulders as you lift your head and tilt your chin toward your chest. Draw your belly button toward your pubic bone and gradually lift each vertebrae off the mat, one at a time.
- Return to a sitting position tall and immediately begin the next rep.
Tips for performing Pilates roll-ups
With proper form and mechanics, you can maximize the effectiveness of the roll-up exercise while avoiding injury. Here are some things to keep in mind.
- Slowly move the individual vertebrae at a speed sufficient to articulate them. “When placing a string of pearls, imagine placing one pearl at a time,” George says. The same goes for returning to a sitting position. Think about lifting one pearl at a time.
- If you throw your arms out in front of you or notice your feet lift off the floor when you curl up, you’re probably relying too much on momentum and not engaging your core properly.
- Raising your arms above your head or onto the floor requires significant shoulder mobility and core strength. If you notice your ribcage expanding as you roll, raise your arms to chest level or slightly above your head.
Benefits of Pilates Rollups
Roll-up exercises offer countless benefits to practitioners of all abilities and experience levels. Here are some reasons why it’s worth incorporating into your training.
1. Strengthen your core
Roll-ups work the surface and deep core muscles that are essential for good posture and help support and stabilize your body as you move. However, George makes it clear that proper form is important.
“It’s important to perform roll-ups and roll-downs with speed and control, especially to get the most out of your deep core muscles,” she says.
2. Improves spinal mobility
Roll-ups provide a wide range of spinal movement, which helps improve and maintain spinal mobility. Being able to move your spine freely without stiffness or pain can impact everything from your ability to get out of bed to participating in your favorite physical activities.
3. Supports back health
Performing roll-ups regularly will strengthen your lower back muscles. This reduces back pain, prevents injuries, and improves posture and stability.
4. Add definitions to the center section.
If you’re aiming for six-pack abs, you’ll definitely want to add roll-ups to your repertoire. Roll-ups target the rectus abdominis, the top layer of abdominal muscles, and give shape and definition to your midsection. “Roll-ups are more than basic crunches,” says George.
How to make Pilates roll-ups easier
If you have trouble with standard rollups, there are several ways to make it easier and more accessible.
please bend your knees
As shown in a modified version of the roll-up by XB Pilates creator Andrea Rogers, instead of keeping your legs straight during the movement, bend your knees so your feet are flat on the floor.
Please put your elbows in
“You can use your elbows to elevate yourself on the way down or up, while maintaining a slow, controlled range of motion, which helps you get the most out of that movement,” says George.
go halfway
“You can also do a half roll down, rolling until your hips or sacrum touch the ground, then rolling back up,” says George. “It’s better to do a half roll-up with really good control than to go up and down with momentum.”
Please grab my thighs
Placing your hands on your hamstrings and using a little arm strength to raise and lower your torso will help maintain the integrity of the exercise and build core strength.
use a balance ball
George recommends placing a small balance ball between your thighs. “The inner thighs connect to your pelvic floor, so strengthening your pelvic floor will help strengthen your abdominal muscles,” she explains.
You can also place a small exercise ball behind your back to provide support and feedback during half roll-ups.
get a resistance band
Wrap one end of the resistance band around a stationary structure, such as a bar or weight rack, then hold the other end as you roll it up. “A lot of people think that wearing a resistance band makes it more difficult, but in this case, it helps you with control on the way down and helps you stand up afterwards,” says George.
How to make Pilates roll-ups harder
Looking for a killer core challenge? Here are some ways to make your roll-ups even harder.
hovering legs
From your starting position (sitting, legs bent, feet flat on the floor), extend one leg and raise it about 1 foot above the ground. Keep your leg raised as you perform the roll-up, then complete the same number of repetitions with the opposite leg raised.
Add a set of weights
Perform the roll-up as you normally would, but with dumbbells in each hand. Start with a light weight and be careful not to build up momentum.